
Guess what is coming... on October 1st? You guessed it... WORLD CARD MAKING DAY!
We here at Two Scrapbook Friends want to see all your amazing cards! So we are creating a special WCMD section in our gallery for you to upload all your cards!
The rules are as follows...
1. You can upload from Sept 22nd 12:01 am to Sept 29th midnight!
2. Load as many cards as you want as long as they are not currently in our gallery.
3. Tell all your friends to upload theirs, try using your blogs and Facebook!
4. Be as creative as possible. You never know who is looking!
5. Although buttons (please see our forum for what buttons are and how you can earn them) will not be awarded for these uploads, we may just be feeling generous!
6. Some random prizes and perhaps some not so random prizes will be awarded on WCMD!!
Come join us in building a fantastic card gallery to use as inspiration for a long time!
Our gallery can be found here and our forum can be found here.
You will need separate logins for both so I suggest you get started!
Any questions can be asked under the Special Occasions (NSD & WCMD) & Events section of our forum!
Hope to see your work there!
Saturday, September 24, 2011
Tuesday, September 20, 2011
I Flip for Florida
Over at Two Scrapbook Friends, we have just wrapped up another successful online crop. The winners will be announced soon. Stay tuned to the forum and blog for that!
For Joanne's back to school shopping challenge, I cheated a bit and did a layout just about shopping!
While in Florida earlier this year, Old Navy had flip flops on sale, so I bought a pair in every colour in my size! They looked so pretty out in the sun I just had to take a few photos!
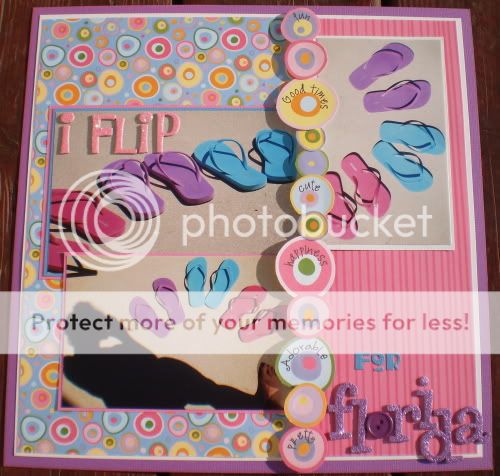
I used these fun papers by Pinecone Press and some of my new glittery Thickers.
It was a great crop and I was so happy to get a few layouts done.
For Joanne's back to school shopping challenge, I cheated a bit and did a layout just about shopping!
While in Florida earlier this year, Old Navy had flip flops on sale, so I bought a pair in every colour in my size! They looked so pretty out in the sun I just had to take a few photos!
I used these fun papers by Pinecone Press and some of my new glittery Thickers.
It was a great crop and I was so happy to get a few layouts done.
Thursday, September 15, 2011
DT Reveal
The Friends over at TSF are shaking things up a bit with the DT. We will be revealing our creations throughout the month, not just all at the beginning. So this meant that right after working with the We R Memory Keepers travel line for the September 1st reveal, I got to immediately start playing with the new travel line from Imaginisce. Yeah me!!
Here's what I got to work with: lots of great double sided papers, card stock, stickers, tags, canvas embellishments, a stamp, ribbon, buttons, plus chipboard letters from Jillybean Soup. Fun!

Stay tuned! I crafted a few more things for this reveal!!
Here's what I got to work with: lots of great double sided papers, card stock, stickers, tags, canvas embellishments, a stamp, ribbon, buttons, plus chipboard letters from Jillybean Soup. Fun!

When I looked carefully at the papers, I realised there were many references to Australia. So of course I had to make my first page for my new album of our trip DownUnder this past summer. I covered a large chipboard arrow with paper as well as the label above the large photo. I love how my printed journalling fits so nicely on the tags/postcards!


I also loved the blues and golds in these papers. I still had a few more pages to go for last summer's trip to Europe. And since Lufhansa's colours are blue and gold, I knew this was perfect! This is really a double pager, but I took the photos separately since I just couldn't get a good shot of them side by side. I included the first class menu here too! That's me putting in my ear plugs to get ready to sleep in my flat bed!

Stay tuned! I crafted a few more things for this reveal!!
Back to School Online Crop~ Numbers!
I have been doing lots of fun scrapping for the challenges at Two Scrapbook Friends' Back to School on line crop. Shelby has challenged us to do some 'rithmatic and make numbers a key part of a layout.
This is another layout of the girls' weekend at Tina's cottage. Scenic Route papers again plus Thickers and alpha stickers by October Afternoon and Studio Calico.
This is another layout of the girls' weekend at Tina's cottage. Scenic Route papers again plus Thickers and alpha stickers by October Afternoon and Studio Calico.

There is still time to participate!
Tuesday, September 13, 2011
Back to School On Line Crop
Over at TSF we are hosting an on line crop! The theme is "Back to School." There are lots of fun challenges, prizes to be won and great chat and inspiration on the forum. There is still time to participate!
My challenge is to showcase "what you did over the summer holidays" in photos and journalling. Remember that first assignment your teacher would always assign in the first week of school? You get the idea!

I created this layout of a girls' weekend on Lake Huron at my friend Tina's cottage. It is a 5 year tradition now and we had a lovely time, despite the rain and storms. It was the weekend of the Goderich tornado!
I used papers and embellies from Cosmo Cricket's "Social Scene" line. I also added some mini alpha stickers from BoBunny and Thickers by American Crafts. And Sketch Support offered some great inspiration for the design.
Be sure to head on over to the Two Scrapbook Friends forum and gallery to participate in this fun crop!
My challenge is to showcase "what you did over the summer holidays" in photos and journalling. Remember that first assignment your teacher would always assign in the first week of school? You get the idea!
I created this layout of a girls' weekend on Lake Huron at my friend Tina's cottage. It is a 5 year tradition now and we had a lovely time, despite the rain and storms. It was the weekend of the Goderich tornado!
I used papers and embellies from Cosmo Cricket's "Social Scene" line. I also added some mini alpha stickers from BoBunny and Thickers by American Crafts. And Sketch Support offered some great inspiration for the design.
Be sure to head on over to the Two Scrapbook Friends forum and gallery to participate in this fun crop!
Friday, September 9, 2011
Friendzy Friday-- Paper Pumpkins
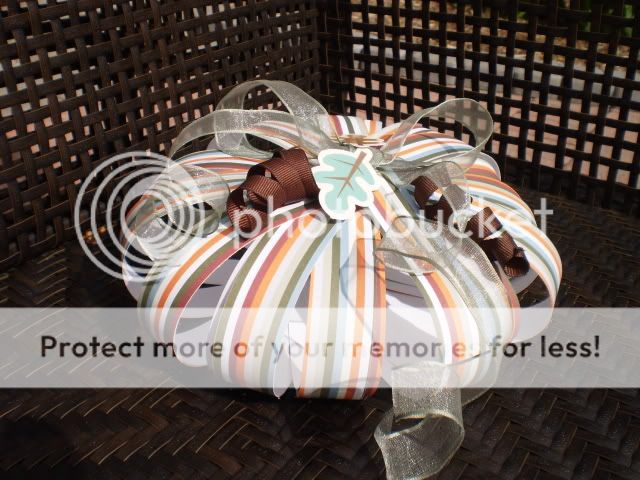
Have you been thinking ahead to your fall decorating? I have! I have been seeing these paper pumpkins around and thought I would give one a try for this week's Friendzy Friday at TSF.
You will need two 12x12 sheets of the same paper. I chose a striped patterned paper, but a card stock or two sided paper would work just as well. You also need approx 14 inches of thin ribbon, a large gauge needle, an eighth inch hole punch,and some embellishments for your finished pumpkin.

Trim your paper into 1 inch strips. This will give you a big pumpkin. I shortened my strips to 10 inches for a medium sized pumpkin. Your choice!

Punch a hole in each end of every strip.

Stack your strips and thread the ribbon through the holes in one end, securing with a large knot.

Thread the ribbon through the holes in the other end, pulling the strips into a "C" shape and secure with another large knot. Ensure that your pattern (if you have one) is facing on the outside of the "C."

Shape your strips into a round pumpkin form. You may want to adhere a small circle of cardstock to the bottom to give your pumpkin some stability.

Now decorate your pumpkin. I used this wired green ribbon for a large bow. I adhered some chipboard leaves from Imaginisce and I made these brown tendrils by spraying ribbon with fabric stiffener and rolling the ribbon around a pencil until dry.
Wouldn't a few of these make a lovely centerpiece or mantle arrangement? Give them a try and be sure to show us your creations!
You will need two 12x12 sheets of the same paper. I chose a striped patterned paper, but a card stock or two sided paper would work just as well. You also need approx 14 inches of thin ribbon, a large gauge needle, an eighth inch hole punch,and some embellishments for your finished pumpkin.
Trim your paper into 1 inch strips. This will give you a big pumpkin. I shortened my strips to 10 inches for a medium sized pumpkin. Your choice!
Punch a hole in each end of every strip.
Stack your strips and thread the ribbon through the holes in one end, securing with a large knot.
Thread the ribbon through the holes in the other end, pulling the strips into a "C" shape and secure with another large knot. Ensure that your pattern (if you have one) is facing on the outside of the "C."
Shape your strips into a round pumpkin form. You may want to adhere a small circle of cardstock to the bottom to give your pumpkin some stability.
Now decorate your pumpkin. I used this wired green ribbon for a large bow. I adhered some chipboard leaves from Imaginisce and I made these brown tendrils by spraying ribbon with fabric stiffener and rolling the ribbon around a pencil until dry.
Wouldn't a few of these make a lovely centerpiece or mantle arrangement? Give them a try and be sure to show us your creations!
Thursday, September 1, 2011
September DT Reveal
Hard to believe it is September! For this month's TSF Design Team reveal, I got to work with the Travel Light line from We R Memory Keepers. I do lots of travel layouts so it was very cool to get travel themed product! I received some patterned paper, journalling tags, buttons, muslin banners, twine, and Creative Imaginations alpha stickers.

My parents both have birthdays coming up, so I made two cards. My mom taught me some folding techniques so she will love this butterfly on her card!


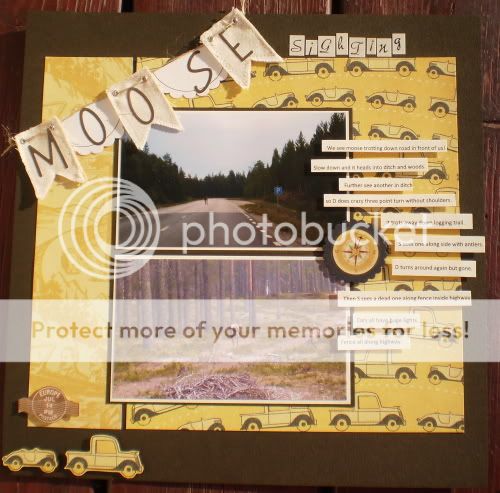
I thought the "road trip" theme paper would go well with these photos of northern Sweden near the arctic circle. We rented a car and drove as far north as we could before we had to turn around to catch our plane back to Stockholm. Luckily for us, these moose decided to wander near our path!

Some of the papers were airplane themed, so I thought they would go great with these photos of the first class lounge and plane ride we took last summer to Germany. And it was a great excuse to blow the dust off some of my Quickutz dies like the globe and airplane.


Be sure to check out what the other very talented DT ladies did with their travel papers this month!
My parents both have birthdays coming up, so I made two cards. My mom taught me some folding techniques so she will love this butterfly on her card!
I thought the "road trip" theme paper would go well with these photos of northern Sweden near the arctic circle. We rented a car and drove as far north as we could before we had to turn around to catch our plane back to Stockholm. Luckily for us, these moose decided to wander near our path!
Some of the papers were airplane themed, so I thought they would go great with these photos of the first class lounge and plane ride we took last summer to Germany. And it was a great excuse to blow the dust off some of my Quickutz dies like the globe and airplane.
Be sure to check out what the other very talented DT ladies did with their travel papers this month!
Subscribe to:
Posts (Atom)


